Zero BLOG

Share my ideas with you!


  • Home

  • Archives

  • Tags

  • Categories

  • About

huawei ai

Posted on 2019-08-09 | Edited on 2019-08-30 | In ai , huawei

Atlas人工只能计算平台
首席架构师 周吉鹏

1. Atlas

升腾 : 华为研究的芯片
不对外提供

边缘: 端 - 数据采集
边 - 设备,连接端
云 - 保存数据,发布指令

Atlas 200 加速模块
Atlas 500
16 TOPS INT8

2 鲲鹏大数据平台

大数据解决方案

3 AI变革 洞见工业未来

时间: 2019年8月30日
地点: 上海世博中心@2019全球工业智能峰会

出席嘉宾:
特点 -》 官府人员很多, 上海市政府,上海临港管委会,浙江工业厅,安徽工业厅,江苏工业信息化厅,联合国工业发展组织等国际组织。

长三角的工业大省的工业管理部门都非常重视这次峰会,可以看出现在对工业互联网以及AI在工业上的利用有非常大的期望和需求。

–》 感想: 现在中国提倡发展事业,可以深入研究一下是否有切入点,给予企业多一点的AI应用以及技术支持。

上海: 在建的工业互联网研究中心

国际电信联盟秘书长: 赵厚麟

  • 第一梯队: 上海的工业互联网

上海工业互联网体验中心(Todo ,检索)

  • 工业5.0时代 (现在的重点关注)
  • 面向全球募集解决方案

    远程运维 (高端设备)
    生物医药

长三角G60工业互联网创新

  • 上海要打造工业互联网的中心

利用apache和putty 实现外网443端口访问本地8080端口

Posted on 2019-06-26 | In network , 开发环境构建

[前言]

在开发中,经常需要使用外部服务实现一些功能,如微信,科大讯飞的一些功能。这些功能中会要求回调(callback)服务器端的功能。

大家也知道,一般开发环境基于内网环境,没有global ip。所以开发时,如何测试外部服务的回调是个难题。

本文主要是记录如何利用服务器的端口映射来实现外部服务调取开发机(8080)的方法,望可以帮助大家。

[设置的前提条件]

  1. 一台有固定IP(gloabl ip)的服务器,有root的访问权限
  2. apache软件安装好
  3. 本地环境有putty软件

    [实施步骤]

假设我们本地要访问 localhost:8080/wx的服务。

  1. 设置putty的tunnel,实现本地端口和服务器端口的映射

服务器端的端口:3000
本地端口: 8080

注意: 这个设置设置好后,点击【add】按钮后,将设置保存。

  1. apache里设置代理

在apache的ssl.conf 添加443 转接 3000的代理


ProxyPass /wx http://127.0.0.1:3000/wx
ProxyPassReverse /wx http://127.0.0.1:3000/wx

然后重启httpd服务

以上就是设置完了以后,

  • 访问https:xxxx.xxx.xxx/wx
  • 服务器的apache 将起跳转到 本地的3000端口
  • putty的tunnal 把服务的3000端口映射到本地的8080(开发机器)

这样就是想了外部对本地机器的访问。

以上apache及putty的使用方法没有进行详细的记述,大家在百度或者谷歌上搜索具体的博客去参考。

最后

关注我的博客:

  • 腾讯云站点
  • gitHub站点

hexo install learnCloud

Posted on 2019-06-11 | In Hexo教程

在hexo的nexT主题里添加Leancloud用来统计统计文章阅读量

1 配置步骤

1.1 注册LeanCloud账号

my-sons-paint

Posted on 2019-06-02 | Edited on 2019-06-03 | In my son`s paints

我的小孩今年开始学习画画,在这里我会定期的揭示他的作品

作品1

作品2

作品3

作品4

作品5

作品6

hexo-theme-landscape

Posted on 2019-06-02 | Edited on 2019-06-03 | In Hexo教程

前言

用hexo构建了博客系之后,发现还需要很多事情要做,比如选择主题,增加评论功能,修改css已达到自己满意的效果,同时还需要兼顾手机端的表现,还有国际化的问题。

首先,第一个任务是确定主题。hexo给的缺省的主题是Landscape,这个主题开始并不是很满意,但是换了几个主题后,还是发现用原生的主题较好,所以对于这个主题进行改造。

目录

  • 1. 注册github,coding.net的账号

构建步骤

参考

  • 利用Hexo在多台电脑上提交和更新博客
  • 潘柏信:HEXO搭建个人博客
  • Markdown教程

课题

  • 搭建多语言的环境(中,日,英)
  • 知识点封层管理
  • 追加评论功能
  • 追加网站数据访问分析功能
  • Mac OS 环境构建hexo环境

最后

关注我的博客:

  • 腾讯云站点
  • gitHub站点

handsontables

Posted on 2019-05-14 | Edited on 2019-06-06 | In jquery

在现在的项目中,需要可以编辑的表格。要求使用感觉接近于Excel的编辑风格。

  • 类似与Excel的编辑风格
  • 可复制粘贴单元格

调查了一下常用的插件,感觉handsontable比较好用,并且被几个主流的前段框架(Vue, React,Angular)所采用。

handsontable及使用注意点如下如下:

  • 1. license问题
  • 2. handsontable的参数
  • 3. handsontable使用注意点

1.关于handsontable的版本和licence问题。

我们需要的是开源的功能,但是handsontable的7.0版本以后,不支持免费的应用。

handsontable6.2.2 如下:
参照资料: handsontable6.2.2 license

Licensing
Handsontable is an open source library released free under the MIT license.

The MIT license

Handsontable Pro is a fully commercial software distributed and supported by Handsoncode sp. z o.o.

General Software License Terms v4

handsontable7.0.3 的如下:
[参照资料: handsontable7.0.3 license](https://handsontable.com/docs/7.0.3/tutorial-licensing.html

Licensing
Handsontable Non-Commercial License
It allows you to use this software for such non-commercial purposes as, but not limited to, research, private study, and evaluation. Your use in commercial settings is strictly limited to evaluation, development and testing tier of a software deployment architecture. In other words, you can’t enter the production stage if your project is anyhow connected with your commercial activity.

Handsontable Non-Commercial License (v1 released on February 19, 2019)
Handsontable Commercial License
General Software License Terms (v4.1 released on February 19, 2019)

7.0版本以后不支持商业性的免费使用,所以推荐使用6.2.2的MIT license版本。 大家可以去github里下载历史版本。

以下都是handsontable 6.2.2 open source 版本的设置以及实现

2. handsontable的参数

本项目中使用的参数如下:

NO 参数 表示内容 Sample
1 data handsontable的数据 json形式
2 colheader 表的表头行内容 json形式; 设置例:[‘列名1’,’列名2’]
3 rowHeaders 行名 设置行名 true:表示1,2…; json形式时表示定义值: 如 [‘行名1’,’行名2’]
4 manualColumnResize 表格是否可以调整宽度 true or false;true的时候,鼠标移动到表头
4 dropdownMenu 下拉框是否表示 true or false;true的时候,鼠标移动到表头

    var employeeTable = new Handsontable(employeeTableDiv, {
      data: employeeData,
      colHeaders: countHeaderArray, 
      rowHeaders: false,
      filters: false,
      dropdownMenu: true,
        manualColumnResize: true,    
        height: 180,
        width: '100%', 
        fixedColumnsLeft: 3,
        autoWrapRow: true,

      formulas: true,
      columns: [
              {data: 'deletebutton', width:50, renderer: "html", className: "htCenter",readOnly: true}

              ,{data: 'div', type:'text', width: 50, className: "htCenter",readOnly: true, renderer: grayBackgroundColorTextRenderer }
            ,{data: 'cost', width: 120,  className: "htRight",readOnly: true,  type: 'numeric',numericFormat: {pattern: '0,0.00'}, renderer: grayBackgroundColorNumberRenderer}
            ,{data: 'peoplecost', width: 100,  className: "htRight",readOnly: true,  type: 'numeric',numericFormat: {pattern: '0,0.00'}, renderer: grayBackgroundColorNumberRenderer}

          ]
    });

3. handsontable使用注意点

memo:

  • 实现表示不下的时候的…效果
  • 合并单元格
  • 设置cell颜色
  • 设置点击事件

Todo:

  • 如何保存选择的select的值
  • 继续这个博客

构建Hexo博客环境(github,coding)

Posted on 2019-05-13 | Edited on 2019-08-09 | In Hexo教程

前言

准备做一个技术博客,记录自己在开发中遇到的问题。看github的源码,发现很多技术类的文章都使用md文件格式,也注意到包括国内的csdn,国外的stackflow都支持markdown的格式,所以准备用markdown格式搭建博客。

感谢各个博客网站的文章,决定使用hexo框架来搭建环境。并且自己会有在多台电脑上编辑的习惯,所以构建多台可以同时编辑的博客环境。

hexo框架主要是用来生成共同的header,footer以及有友好的发布环境,博客的内容还是有markdown来书写。
主要的技术point如下:

  • 1. 注册github,coding.net的账号
  • 2. 搭建hexo环境
  • 3. hexo的发布
  • 4. 构建多台电脑发布的环境

构建步骤

1. 注册github,coding.net的账号

由于国内环境访问github速度较慢,所以在github发布的同时,在国内的腾讯云开发者平台(codding.net)上也同时发布博客。以下是构建两个环境的方法。

1.1 注册github及设置博客仓储

注册方法参照官网,去注册一个账号吧。Github
注册完后,添加一个公开的仓库。

  • 名称必须是:github用户名.github.io

只有这样,将来要部署到GitHub page的时候,才会被识别,也就是通过自己的用户名.github.io去访问自己的博客。

1.2 注册腾讯云开发者平台及设置博客仓储和项目仓储

同理,在腾讯云开发者平台里添加一个公开的仓库。

  • 名称必须是:用户名.coding.me

以后也可以通过 自己的用户名.coding.me来访问

1.3 任务小结

任务编号 任务名称 要求
task1 建立github账号并且添加博客仓库 仓库名称: github用户名.github.io
task2 建立腾讯云账号并且添加博客仓库 仓库名称: 用户名.coding.me
task3 在腾讯云里添加hexo的代码仓库(私有) 仓库名称:hexo-source-backup

2. 搭建hexo环境及选择主题

Hexo是基于nodeJs编写的,所以首先安装node.js

2.1 安装node.js

我用的是windows10,所以通过node.js站点下载安装了node.js

2.2 安装git

我用的是windows10,所以通过腾讯软件中心站点下载安装了git。 官网速度太慢,所以建议用以上链接下载

2.3 安装hexo

git和node.js安装好后,就可以开始安装hexo了,你首先创建一个blog的文件夹。选中文件夹后右键选择【Git Bash here】, 会跳出git的命令窗口。

输入命令

$ npm install -g hexo-cli
$ hexo -v
安装完成后确认
$ ls -ltr
-rw-r--r-- 1  1049089   2206 5月  10 17:33 _config.yml
-rw-r--r-- 1  1049089    174 5月  13 17:13 db.json
drwxr-xr-x 1  1049089      0 5月  10 15:20 node_modules/
-rw-r--r-- 1  1049089    516 5月  10 14:55 package.json
-rw-r--r-- 1 1049089 165056 5月  10 14:55 package-lock.json
drwxr-xr-x 1  1049089      0 5月  13 16:58 public/
-rw-r--r-- 1  1049089     14 5月  13 15:36 README.md
drwxr-xr-x 1  1049089      0 5月  10 12:56 scaffolds/
drwxr-xr-x 1  1049089      0 5月  10 18:13 source/
drwxr-xr-x 1  1049089      0 5月  13 15:38 themes/

2.4 设置hero

主要设置_config.yml

....
title:  BLOG
subtitle: Share my ideas with you!
description: *****
keywords: ******
author: USERNAME
language:
timezone:
.....
deploy:
  type: git
  repo: 
   github: https://github.com/xxxxx/xxxxx.github.io.git,master 
   coding: https://git.dev.tencent.com/xxxxxx/xxxxxx.coding.me.git,master

这个里面配置博客的名称以及发布环境的设置。 注意冒号后边必须有半角的空格。

2.5 任务小结

任务编号 任务名称 要求
task4 安装node.js -
task5 安装git -
task6 安装hexo -
task7 设置_config.yml 设置发布信息到环境

3. hexo的发布

3.1 生成ssh key

首先创建ssh key用来访问发布的环境

$ ls -ltr ~/.ssh  ## 确认没有内容
$ ssh-keygen -t rsa -C "youremail"
$ ls -ltr ~/.ssh
total 9
-rw-r--r-- 1 username 1049089 1876 5月  10 13:39 id_rsa
-rw-r--r-- 1 username 1049089  397 5月  10 13:39 id_rsa.pub
-rw-r--r-- 1 username 1049089  817 5月  10 17:26 known_hosts

$ git config --global user.email "your email address";

$ git config --global user.name "your name"

检查是否生成生成id_rsa, id_rsa.pub文件。

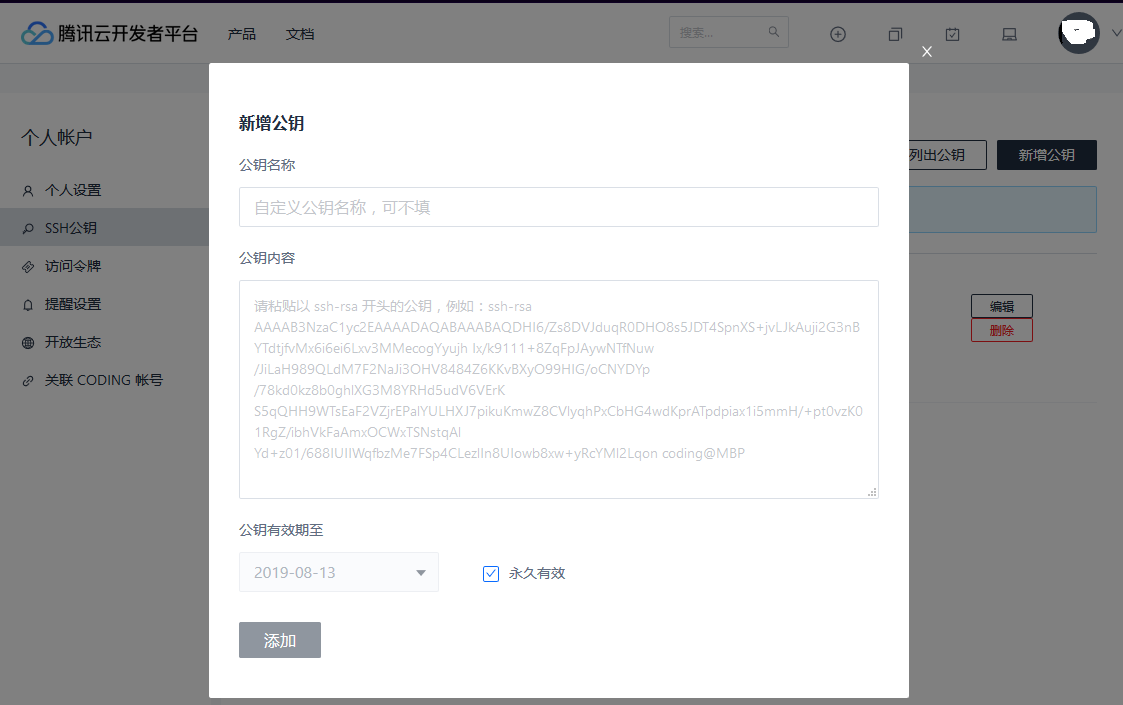
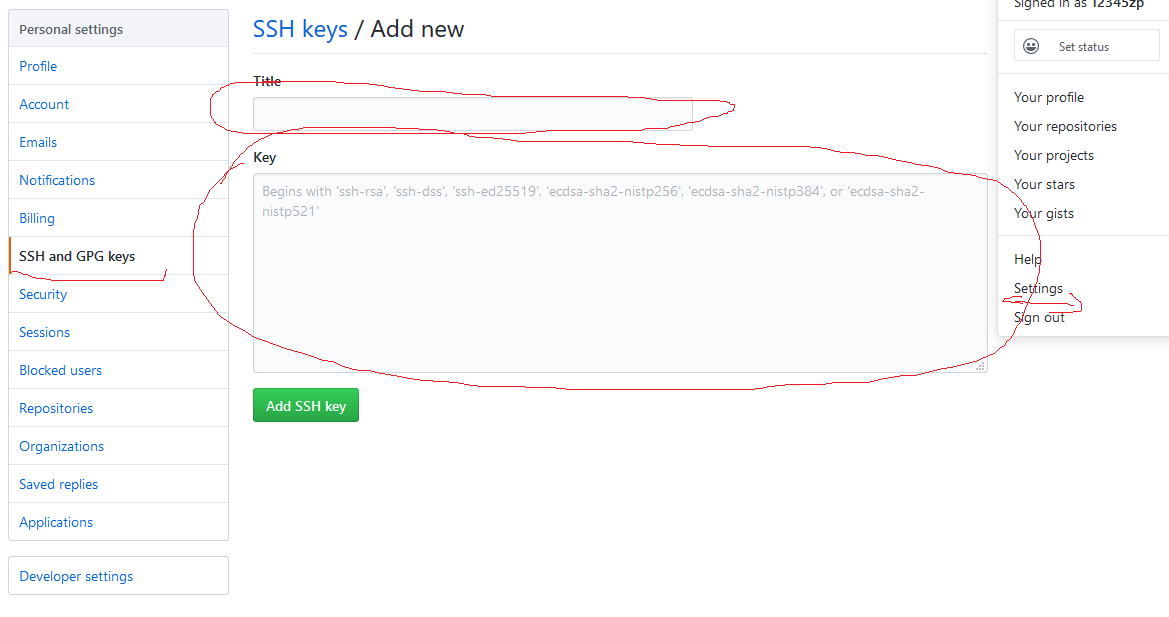
然后将公开key分别设置到Github和腾讯软件中心

3.2 设置公开key到腾讯软件中心的git仓库

腾讯软件中心 -> 个人设置 -> 新增公钥按钮点击

  • 公钥名称:任意
  • 公钥内容:id_rsa.pub的内容复制粘贴到这里

点击【添加】按钮完成设置

3.3 设置公开key到腾讯软件中心的git仓库

Github -> 个人设置settings -> SSH and GPG keys -> Add SSH key 点击

  • Title:任意
  • key:id_rsa.pub的内容复制粘贴到这里

点击【添加】按钮完成设置

3.4 hexo的发布

$ hexo clean 
$ hexo g
$ hexo d   // 发布,会跳出认证画面,输入github和腾讯云开发者中心的用户名和密码即可。
$ hexo s  // 本地需要测试时, hexo g执行完后,执行这个命令,然后用http://localhost:4000进行本地访问。

点击【添加】按钮完成设置

3.5 任务小结

任务编号 任务名称 要求
task8 生成ssh key -
task9 ssh的公钥设置到腾讯云开发中心 -
task10 ssh的公钥设置到github -
task11 发布 -

4. 构建多台电脑发布的环境

4.1 在1-3里构建的电脑里,将hexo的环境更新到远程环境

$ git init //初始化本地仓库 
$ git remote add origin "task3做成的私有仓储" //添加远程仓库 
$ git pull origin master git add . //添加本地所有文件到仓库 
$ git commit -m "blog源文件" //添加commit 
$ git push -u origin master 

4.2 在新的电脑里安装软件并取得hexo环境
参照2.1,2.2,2.3安装软件, 然后取得最新的消息

$ git clone -b master "task3做成的私有仓储" 
$ npm install

4.3 每次操作电脑之前,对于本地仓库的更新

$ git pull

参考

  • 利用Hexo在多台电脑上提交和更新博客
  • 潘柏信:HEXO搭建个人博客
  • Markdown教程

课题

  • 搭建多语言的环境(中,日,英)
  • 知识点封层管理
  • 追加评论功能
  • 追加网站数据访问分析功能
  • Mac OS 环境构建hexo环境

最后

关注我的博客:

  • 腾讯云站点
  • gitHub站点

Zero

Time To Make A Change!
7 posts
7 categories
8 tags
GitHub E-Mail Blog@腾讯云 Blog@gitHub
Creative Commons
© 2019 Zero
Powered by Hexo v3.8.0
|
Theme – NexT.Gemini v7.1.2